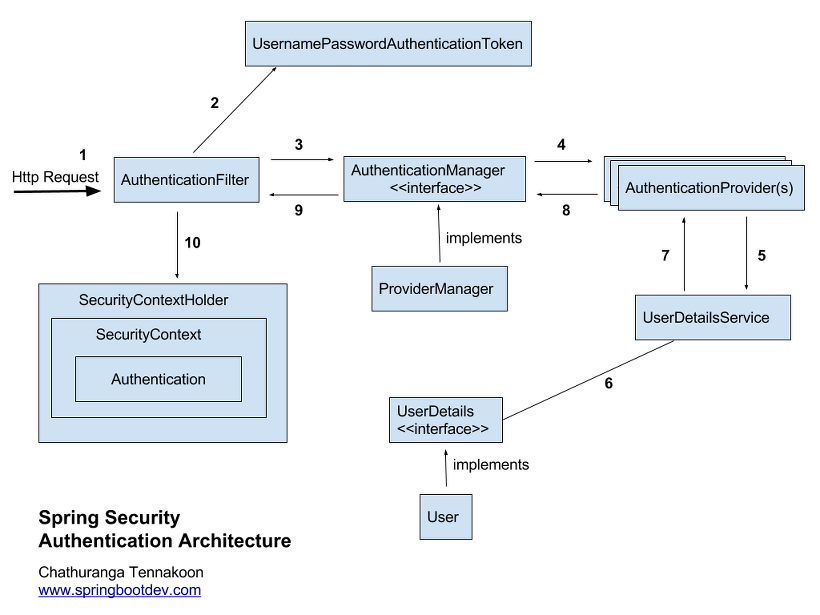
간단하게 앞에 배웠던 내용을 정리해보자

AuthenticationFilter는 요청을 가로채서 인증 책임을 AuthennticationManager에 위임하여
AuthenticationManager는 AuthenticationProvider를 이용해 요청을 인증한다
여기서 AuthenticationProvider는 UserDetailService와 PasswordEncdoer를 호출해 암호를 검증하는 인증논리를 정의한다
이후 반환된 성공한 인증 호출의 세부정보는 AuthenticationFilter에 의해 SecurityContext에 저장된다
간단한 예제에서는 bcryt 및 scrypt로 해시된 암호를 검사하고 formLogin 인증방법으로 구성할 것이다
@Entity
public class User extends UserDetails{
	@Id
    @GeneratedValue
    private Long id;

    private String name;

    private String password;

    @Enumerated(EnumType.STRING)
    private EncryptionAlgorithm algorithm;

    @OneToMany(mappedBy="user",fetch=FetchType.EAGER)
    private List<Authority> roles;

    @Override
    public Collection<? extends GrantedAuthority> getAuthorities() {
        return user.getAuthorities().stream()
                   .map(a -> new SimpleGrantedAuthority(a.getName()))
                   .collect(Collectors.toList());
    }

    @Override
    public String getPassword() {
        return this.memberPassword;
    }

    @Override
    public String getUsername() {
        return this.memberId;
    }

    @Override
    public boolean isAccountNonExpired() {
        return true;
    }

    @Override
    public boolean isAccountNonLocked() {
        return true;
    }

    @Override
    public boolean isCredentialsNonExpired() {
        return true;
    }

    @Override
    public boolean isEnabled() {
        return true;
    }
}
public Enum EncryptionAlgorithm{
	BCRYPT,SCRYPT
}
@Entity
public class Authority {

    @Id
    @GeneratedValue(strategy = GenerationType.IDENTITY)
    private Integer id;

    private String name;

    @JoinColumn(name = "user")
    @ManyToOne
    private User user;

    public Integer getId() {
        return id;
    }

    public void setId(Integer id) {
        this.id = id;
    }

    public String getName() {
        return name;
    }

    public void setName(String name) {
        this.name = name;
    }

    public User getUser() {
        return user;
    }

    public void setUser(User user) {
        this.user = user;
    }
}
지금까지 UserDetails와 Authority 관련 테이블 생성을 완료하였다. 이제 Service 를 만들어보자
Repository는 JpaRepository를 구현한 인터페이스가 있다고 가정하자
@Service
public class JpaUserDetailsService implements UserDetailsService {

    @Autowired
    private UserRepository userRepository;

    @Override
    public User loadUserByUsername(String username) {
        Supplier<UsernameNotFoundException> s =
                () -> new UsernameNotFoundException("Problem during authentication!");

        User u = userRepository.findUserByUsername(username).orElseThrow(s);

        return u;
    }
}
원래는 도메인을 컨트롤러단에 던지는 것보다는 dto로 만들어서 보내주는게 좋지만 간단한 예제이기때문에 dto생성은 생략한다
@Configuration
public class ProjectConfig extends WebSecurityConfigurerAdapter {

    @Autowired
    private AuthenticationProviderService authenticationProvider;

    @Bean
    public BCryptPasswordEncoder bCryptPasswordEncoder() {
        return new BCryptPasswordEncoder();
    }

    @Bean
    public SCryptPasswordEncoder sCryptPasswordEncoder() {
        return new SCryptPasswordEncoder();
    }

    @Override
    protected void configure(AuthenticationManagerBuilder auth) {
        auth.authenticationProvider(authenticationProvider);
    }

    @Override
    protected void configure(HttpSecurity http) throws Exception {
        http.formLogin()
            .defaultSuccessUrl("/main", true);
        http.authorizeRequests().anyRequest().authenticated();
    }
}
@Service
public class AuthenticationProviderService implements AuthenticationProvider {

    @Autowired
    private JpaUserDetailsService userDetailsService;

    @Autowired
    private BCryptPasswordEncoder bCryptPasswordEncoder;

    @Autowired
    private SCryptPasswordEncoder sCryptPasswordEncoder;

    @Override
    public Authentication authenticate(Authentication authentication) throws AuthenticationException {
        String username = authentication.getName();
        String password = authentication.getCredentials().toString();

        CustomUserDetails user = userDetailsService.loadUserByUsername(username);

        switch (user.getUser().getAlgorithm()) {
            case BCRYPT:
                return checkPassword(user, password, bCryptPasswordEncoder);
            case SCRYPT:
                return checkPassword(user, password, sCryptPasswordEncoder);
        }

        throw new  BadCredentialsException("Bad credentials");
    }

    @Override
    public boolean supports(Class<?> aClass) {
        return UsernamePasswordAuthenticationToken.class.isAssignableFrom(aClass);
    }

    private Authentication checkPassword(CustomUserDetails user, String rawPassword, PasswordEncoder encoder) {
        if (encoder.matches(rawPassword, user.getPassword())) {
            return new UsernamePasswordAuthenticationToken(user.getUsername(), user.getPassword(), user.getAuthorities());
        } else {
            throw new BadCredentialsException("Bad credentials");
        }
    }
}
AuthenticationProvider를 구현함으로써 인증 논리를 작성하였다. 인증 논리를 위해서는 종속성으로 UserDetailsService구현과 두개의 암호 인코더가 필요하고 이외에도 authenticat()와 support() 메서드를 재정의해야한다.
그래서 결과적으로 실행해보면 첫번재는 시큐리티의 로그인 화면이 나올것이다. 그래서 로그인하면 아마 에러 페이지가 나올것이다. 그 이이유는 어떠한 url도 설정한 것이 없고, 뷰단도 설정한 것이 없기 때문이다.
일단 로그인화면과 로그인후 에러 페이지가 나오고 "/logout"하면 로그아웃 페이지가 나온다면 성공한 것이다.
'개발 이론 > Spring Security' 카테고리의 다른 글
| [Spring Security] 권한 부여 : 제한 적용 (1) | 2023.11.12 |
|---|---|
| [Spring Security] 권한 부여 구성 : 액세스 (0) | 2023.11.10 |
| [Spring Security] AuthenticationProvider(인증 공급자), SecurityContext (0) | 2023.11.07 |
| [Spring Security] PasswordEncoder (1) | 2023.11.02 |
| [Spring Security] UserDetailService, UserDetails (1) | 2023.11.01 |

